- 1 1/2 lbs ground beef (or a mix of beef and pork for extra richness)
- 1 cup breadcrumbs
- 1/2 cup milk
- 1 large egg
- 1 small onion, finely chopped
- 2 cloves garlic, minced
- 1/4 cup fresh parsley, chopped (optional)
- 1 teaspoon salt
- 1/2 teaspoon black pepper
- 1/2 teaspoon smoked paprika (optional, for depth)
For the Tomato Beef Sauce:
- 1 tablespoon olive oil
- 1 small onion, finely chopped
- 2 cloves garlic, minced
- 1 lb ground beef (optional, for extra richness in the sauce)
- 1 (24 oz) jar marinara sauce (or homemade tomato sauce)
- 1 tablespoon Worcestershire sauce
- 1 tablespoon brown sugar (optional, for sweetness)
- 1/2 teaspoon dried oregano
- Salt and black pepper, to taste
Step-by-Step Instructions
1. Preheat the Oven
- Preheat your oven to 375°F (190°C).
- Lightly grease a loaf pan or line a baking sheet with parchment paper for easy cleanup.
2. Prepare the Meatloaf Mixture
- In a large mixing bowl, combine the ground beef, breadcrumbs, milk, egg, onion, garlic, parsley (if using), salt, black pepper, and smoked paprika. Mix gently until just combined—do not overmix, as this can make the meatloaf dense.
- Transfer the mixture to the prepared loaf pan or shape it into a loaf on the baking sheet.
3. Make the Tomato Beef Sauce
- Heat olive oil in a skillet over medium heat. Add the onion and garlic, and sauté for 3–5 minutes, until softened and fragrant.
- Optional: Add the ground beef to the skillet and cook until browned, breaking it apart with a spoon.
- Stir in the marinara sauce, Worcestershire sauce, brown sugar (if using), oregano, salt, and black pepper. Simmer for 5–10 minutes, stirring occasionally, until the flavors meld together.
4. Assemble and Bake
- Pour half of the tomato beef sauce evenly over the top of the meatloaf.
- Bake in the preheated oven for 45–50 minutes, or until the internal temperature of the meatloaf reaches 160°F (71°C).
- During the last 10 minutes of baking, pour the remaining sauce over the meatloaf for extra flavor and moisture.
5. Rest and Serve
- Remove the meatloaf from the oven and let it rest for 10 minutes before slicing. This allows the juices to redistribute, keeping the meatloaf moist.
- Slice the meatloaf and serve with additional sauce drizzled on top.
- Optional: Garnish with fresh parsley for added color and freshness.
- Enjoy every bite of this juicy, flavorful, and indulgent Meatloaf with Tomato Beef Sauce!
- Perfect as a standalone meal or paired with mashed potatoes, roasted vegetables, or a side salad for a complete spread.
Tips for Success
- Use Fresh Ingredients: Fresh garlic, onions, and herbs make a noticeable difference in flavor.
- Switch Proteins: Substitute ground beef with turkey, chicken, or plant-based alternatives for variety.
- Add Mix-Ins: Stir in grated carrots, zucchini, or spinach into the meatloaf mixture for extra nutrition and moisture.
- Store Leftovers: Store in an airtight container in the fridge for up to 3 days. Reheat gently in the oven or microwave before serving.
Why This Recipe Works
This Meatloaf with Tomato Beef Sauce combines the tender juiciness of a well-seasoned meatloaf with the bold, tangy flavors of a homemade tomato-based sauce into a dish that’s both satisfying and indulgent. The sauce not only enhances the flavor but also keeps the meatloaf moist and tender during baking. Whether served as a standalone meal or customized with your favorite mix-ins, this recipe delivers big on taste and simplicity without requiring advanced cooking skills.
Conclusion: A Dish Everyone Will Love
Whether you’re craving something hearty and flavorful, looking for a way to elevate your weeknight dinners, or simply want to enjoy a homemade treat, this Meatloaf with Tomato Beef Sauce is sure to delight. Its bold flavors, satisfying textures, and customizable options make it a standout recipe that’s as practical as it is delicious. Plus, its versatility means you can tailor it to suit any occasion.
We’d love to see your creations! Tag us in your photos or share your favorite variations—your take on this meatloaf might just inspire others to try it too! 🍴✨
CLASSIC CHERRY DELIGHT
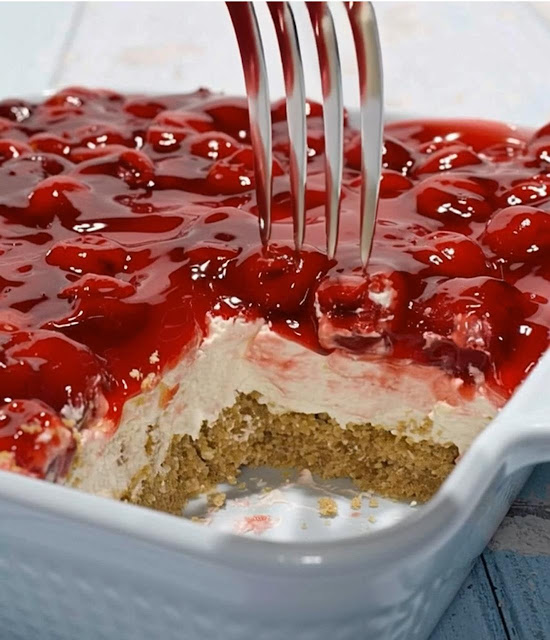
Classic Cherry Delight 🍒🍰: A No-Bake Dessert with Layers of Sweetness and Creamy Comfort
If you’re looking for a dessert that combines the refreshing tartness of cherries with creamy, dreamy layers and a crunchy crust, this Classic Cherry Delight is here to satisfy your cravings. Featuring a buttery graham cracker crust, a rich cream cheese layer, a fluffy whipped topping, and a vibrant cherry pie filling, this no-bake recipe is perfect for potlucks, holidays, or anytime you want a crowd-pleasing treat without turning on the oven. Let’s dive into how you can whip up this easy, foolproof recipe at home!
Why You’ll Love Classic Cherry Delight
- No-Bake Simplicity: Ready in minutes with no oven required—perfect for warm weather or busy days.
- Layers of Flavor: Combines sweet, tangy, and creamy textures for a dessert that’s both light and indulgent.
- Customizable: Swap out cherries for other pie fillings like blueberry, strawberry, or peach.
- Make-Ahead Friendly: Perfect for meal prep or entertaining—it tastes even better after chilling.
Ingredients You’ll Need
(Serves 8–10)
For the Crust:
- 1 1/2 cups graham cracker crumbs (about 10–12 sheets)
- 1/4 cup granulated sugar
- 1/2 cup unsalted butter, melted
For the Cream Cheese Layer:
- 8 oz cream cheese, softened
- 1 cup powdered sugar
- 1 teaspoon pure vanilla extract
For the Whipped Topping Layer:
- 8 oz frozen whipped topping (like Cool Whip), thawed
- Optional: 1/2 cup sour cream (for added tanginess)
For the Cherry Topping:
- 1 (21 oz) can cherry pie filling (or homemade if preferred)
Step-by-Step Instructions
1. Make the Crust
- In a medium mixing bowl, combine the graham cracker crumbs, granulated sugar, and melted butter until the mixture resembles wet sand.
- Press the mixture firmly into the bottom of an 8×8-inch baking pan or a 9-inch square dish to form an even crust.
- Chill the crust in the refrigerator while you prepare the next layers.
2. Prepare the Cream Cheese Layer
- In a large mixing bowl, beat the softened cream cheese, powdered sugar, and vanilla extract with a hand mixer (or whisk) until smooth and creamy.
- Spread the cream cheese mixture evenly over the chilled crust using a spatula.
3. Add the Whipped Topping Layer
- In a separate bowl, gently fold the thawed whipped topping with sour cream (if using) until combined.
- Spread the whipped topping mixture evenly over the cream cheese layer.
4. Add the Cherry Topping
- Spoon the cherry pie filling evenly over the whipped topping layer, spreading it gently to cover the surface.
5. Chill and Set
- Cover the pan with plastic wrap and refrigerate for at least 4 hours, or overnight, to allow the layers to set and the flavors to meld.
6. Serve and Enjoy
- Slice the dessert into squares and serve chilled.
- Optional: Garnish with extra whipped topping, chopped nuts, or a sprinkle of graham cracker crumbs for added flair.
- Enjoy every bite of this sweet, creamy, and indulgent Classic Cherry Delight!
- Perfect as a standalone dessert or paired with a cup of coffee or tea for a complete treat.
Tips for Success
- Use Fresh Ingredients: High-quality cream cheese and fresh vanilla extract make a noticeable difference in flavor.
- Switch Fillings: Substitute cherry pie filling with blueberry, strawberry, or peach for variety.
- Add Mix-Ins: Stir in mini chocolate chips, crushed cookies, or chopped nuts for extra texture and flavor.
- Store Leftovers: Store in an airtight container in the fridge for up to 3 days. Keep chilled until ready to serve.
Why This Recipe Works
This Classic Cherry Delight combines the buttery crunch of a graham cracker crust with the creamy richness of a cream cheese layer, the light fluffiness of whipped topping, and the bold sweetness of cherry pie filling into a dessert that’s both satisfying and indulgent. The no-bake preparation ensures simplicity, while the customizable options allow you to tailor the recipe to your taste. Whether served as a standalone treat or customized with your favorite mix-ins, this recipe delivers big on taste and ease without requiring advanced cooking skills.
Conclusion: A Treat Everyone Will Love
Whether you’re craving something sweet and creamy, looking for a way to elevate your dessert game, or simply want to enjoy a homemade treat, this Classic Cherry Delight is sure to delight. Its bold flavors, satisfying textures, and customizable options make it a standout recipe that’s as practical as it is delicious. Plus, its versatility means you can tailor it to suit any occasion.
We’d love to see your creations! Tag us in your photos or share your favorite variations—your take on this dessert might just inspire others to try it too! 🍴✨